29/3/17
Fairy Tales Research –
As fairy tales will be featuring in a big part of my film I thought it would be a good idea to look at a selection of classic fairy tales and identify the themes and visuals of each so that I can see which ones would work well together.
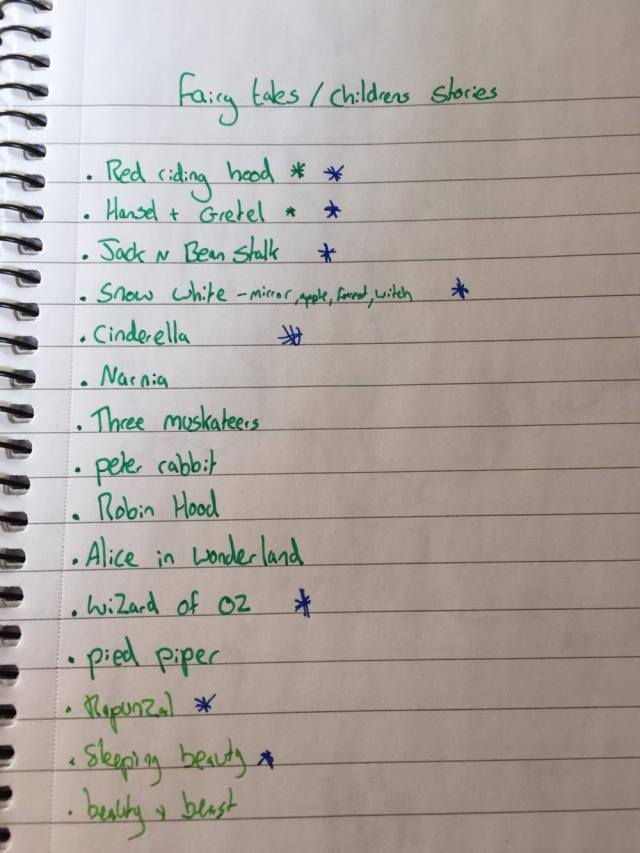
Red Riding Hood – This is the story of a young girl visiting her grandma who then gets into a conflict with The Big Bad Wolf. The moral of this story is the dangers involved with talking to strangers.
Mind map/Mood board – Identifying visuals and themes
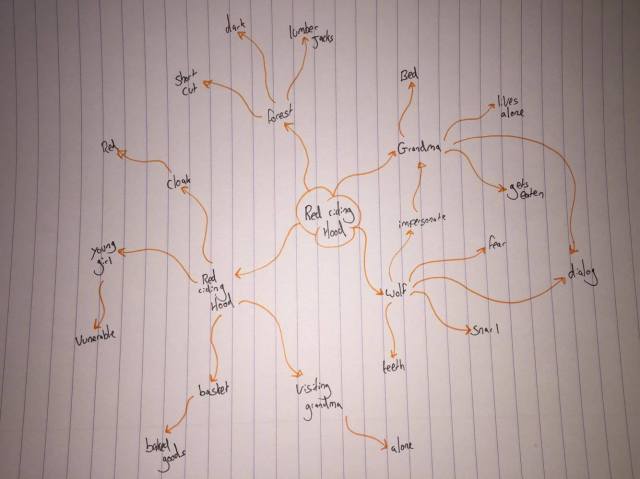


Story Text – http://www.pitt.edu/~dash/type0333.html
Good:
- Well Know – Due to this being one of the most famous fairy tales it is incredibly recognizable. This will make it a lot easier for me to establish the visuals and story as people are already familiar with it.
- Low Budget Stuff – The majority of the visuals and content in this story are very achievable and would only require basic props and costumes to replicate. This would make my production phase a lot less technical and easier to do.
- Strong Visuals – I think mainly the popularity of the story but also the contrast in colour are what make this such a visually strong and recognizable image. Starting out with such a strong image would be a great way to establish the themes of the film with the audience.
- Easy Location – The main bulk of this story is set in a woodland/forest type setting which is a really easy location to come by in my area. This means that I will have a much wider choice of locations and be able to choose the most appropriate one for this scene. I also shouldn’t run into too many problems with filming there or getting permission as a lot of these locations are public.
Bad:
- Wolf more technical – If I wanted to visually show the character of the wolf it would be considerably more difficult than the other aspects of this story. I imagine that I would either have to use CGI or be cleaver with props and lighting, both would be hard to make look visually appealing. Although if I use Red riding hood I would likely only establish the wolf through the use of sound.
- Night Filming – As I am currently picturing the potential scene for this story it would likely be set in a dark wood. This could prove problematic but not impossible. My main issue would be lighting/power but there are a few options available. I would prefer to get the lighting right on set and this would require either a generator or battery powered lights, both of which are fairly easy for me to get hold of. Another option would be to play with the image in post to try and replicate the look I want. I think doing some test shots for these method would be really valuable later on.
Snow White – This is about a jealous evil queen who wants to be the most beautiful in the land. Snow white is more beautiful than her and so she tries various tricks to kill her.
Mind map/Mood board – Identifying visuals and themes
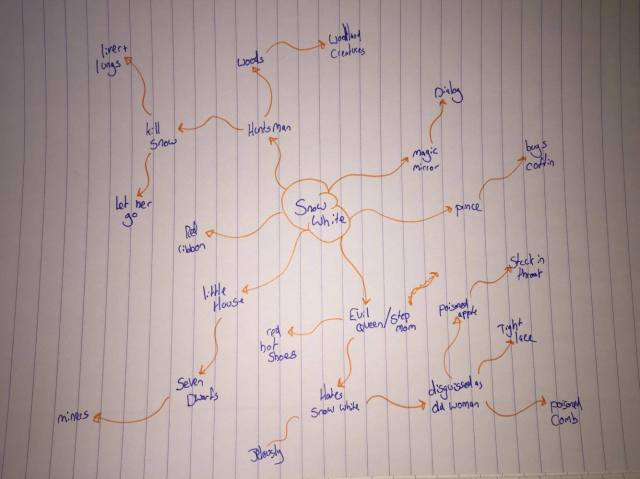


Story Text – http://www.pitt.edu/~dash/grimm053.html
Good:
- Well Know – Due to this being one of the most famous fairy tales it is incredibly recognizable. This will make it a lot easier for me to establish the visuals and story as people are already familiar with it.
- Strong Visuals – Much like Red riding Hood, Snow white is an incredibly famous fairy tale meaning that it’s visuals are highly recognizable. Also Snow white tends to make use of very vibrant colours creating a striking image.
- Lots of content – Snow white although it is a short story contains a number of different settings and scenes from which to draw inspiration. These include the dwarfs house, the woods and the evil queens castle. This means that I have a larger bank of information with which to inform my film.
- Locations Available – Similarly to Red riding hood, Snow White is mainly set in a forest type setting and these are the locations that are most easily available to me where I live. A castle also wouldn’t be out of the question as there are a number of old medieval type buildings scattered around the lake district that I could definitely get outside establishing shots of.
Bad:
- Excess characters – If I am going to cover particular scenes from the story of Snow White I would likely need a greater number of actors and therefore crew in order to properly convey each character. This would make organizing shoot days more of an issue as more people would have to be free at a certain time and make rescheduling difficult.
- Costume crucial – One of the key aspects of creating the visual of Snow White will revolve around costume/set design and this could become a problem depending on availability and price of costumes from various sources.
- Different Versions – I am currently looking at the original plot of Snow white and there are a few differences between this and the more well know Disney version. If I want to stay true to the original it is possible that my audience could become confused as the original isn’t as familiar to them.
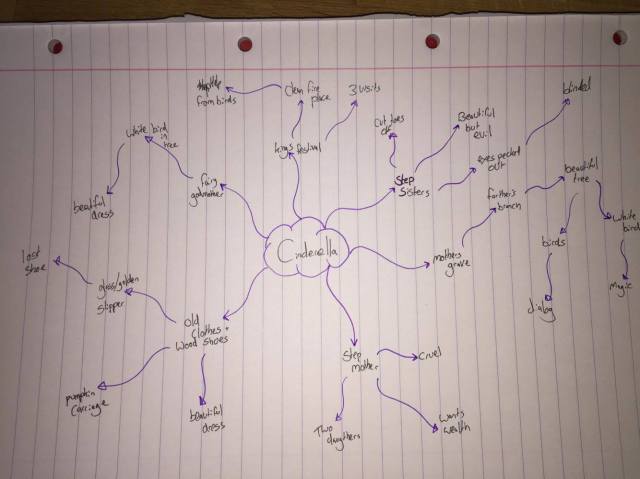
Cinderella – This story is about a young girl and her evil step mother that forces her to work all day and stops her from going to the kings ball. She then gets given a dress from a magical source and marries the prince.
Mind map/Mood board – Identifying visuals and themes


Good:
- Well known – My film will require me to very quickly establish each fairy tale. This means that a more well known character or story will be much clearer to my audience than if I used a less known one which could cause confusion.
- Strong visuals – This is another fairy tale that has a lot of strong visuals that relate to the story. This is mainly down to Disney as they like to put their own spin on things such as the fairy god mother and pumpkin carriage aspects. This means that theres a good variety of material and imagery that I can use or draw from.
- Links in – In the first draft of my story structure I had planned to use the Wizard of Oz as one of my scenes but decided that it doesn’t fit well enough with the classic fairy tale feel that Red Riding Hood and Snow White provide. I feel that Cinderella will be a much better choice as it screams classic fairy tale.
Bad:
- Locations – Unlike other fairy tales, Cinderella will require more of a structural location such as a castle or manor house type vibe. These kinds of locations will be more difficult to find and likely involve me having to get permission, although I do have a few places in mind that could work
- Expensive dress – One of the key visuals from Cinderella is the magnificent dress that she receives. This would prove to be problematic if I wanted to portray this as costumes could become quite expensive. For this reason I will likely go down the other route of portraying my character in the rags that she wears before this.
- Technical Scenes – One of the key visuals from the modern Cinderella and one i’d like to use is the pumpkin turning into a carriage. This could prove to be very demanding in terms of technical ability and would be a challenge but potentially a very fun one. I think that I may use forced perspective in order to change the scale of the pumpkin but not go for the full carriage.
Types of cuts
A large part of my film will be how I choose to cut between each scene and establish that it is a different fairy tale. To help me with this I have looked at various ways of cutting between scenes.
This is a fantastic video essay from Rocket Jump where they highlight a wide variety of cuts and transitions. I have picked out a few that I feel would be appropriate for my film.
Match Cut – This type of cuts involves you matching either the action or composition of two shots and can often be used as a way to seamlessly move between shots/scenes.
Cut on Action – Water spout


Cut on Composition –


Object in Foreground – This cut has the same object moving across the frame and is often used to change location. In this example a car is used as the constant. A big part of making this shot work is ensuring the object is in the same place within the frame on both shots.


Invisible cut – This cut is built on the idea that you can’t see the cut and that the shot looks like one long take. This can be done in a variety of ways but the most common uses a black screen as a cross over point. In this example the character lifts the piano lid to fill the frame with black, the camera then pans up from a black brief case hiding the cut in the moment between the two.


Whip Pan – Cutting on a quick motion from the camera is a very effective way to quickly and smoothly move between shots. This technique is also incredibly easy to do as it doesn’t need a particularly large amount of planning or skill to pull off.


J cut – This type of cut, unlike the others, focuses on sound. The sound of the next shot/scene is brought in before the cut and can help to provide a moment of disorientation and then realisation. This is exactly the kind of cut I was planning on using to bring my character back into reality.
Forced Perspective –
Forced perspective is a in camera technique that allows you to make an object/subject appear larger or smaller than they really are.

In order to pull of this technique there are a couple of things you need to do. Firstly having the object you want to make larger must be in the foreground of the shot and the other object/actor positioned further back from the camera.
A high depth of field is also crucial to this technique as both the foreground and background needs to be in focus in order to make the shot convincing. This translates into a small aperture and large F-stop. This means that your scene must be well lit in order to have enough light coming into the camera to have the exposure and aperture at the right level.
The most famous example of forced perspective is in Lord of the Rings where it used to show the differences in size between the various races and species within that universe
In this scene Gandalf is riding in his cart with Frodo. A custom cart was built for this shot which allows Ian Mckellen to sit further forward as well as mount the camera to the cart.


Other points –
- Eye line – Due to the fact that the actors are in different positions in reality to which they appear on frame means that getting the eye lines right between one or two actors can be difficult as they will often not actually be looking at the subject. This requires a great deal of collaboration between actors and filmmakers to give them their marks so they are looking in the correct direction.
- Static shots – Forced perspective is all about angles so once you start to move the camera the effect is ruined. It is possible to build custom sets and rigs to allow everything to move as one without losing the effect.
A good example of this is where Frodo is pouring tea for Gandalf as the camera pans across the table. A custom table end was built that could be moved along a dolly in sync with the camera.

")
As my film is very low budget and on a short time scale I doubt that I would be able to pull off a shot like this so my forced perspective shots will likely have to be static with the option of animating camera movements in post.
- Multiple angles – The key to selling the effect convincingly is to shot a variety of angles of the same scene which will require me to be a little creative with how I frame my shots.
Dance Scene –
Within the Snow white section of my film I have decided that im going to do an expressive dance to illustrate her character and hopefully convey some of the emotions contained within the fairy tale.
The way in which I will be filming this scene will be quite similar to how I would shoot a music gig. I will designate a stage area and plan out my camera placements/angles accordingly. However because I will be filming this way and will be leaving the choreography in the hands of my actress and crew member it would be difficult to compile a detailed shot list so instead I will most likely do a floor plan and plan specific close ups as the shoot progresses.
In order to get a feel for the types of shots I’ll be doing and also give my actress an idea of the dance style I’ve looked at a selection of dance videos to better prepare myself.
Although a lot of the aesthetics and some of the shot choices would be hard to replicate in this video I found it very helpful in seeing the flow of shots between wides, mids and close as well as how they match the movements between cuts so that the dance doesn’t become jarring.
What I like about this particular video is the use of insert shots within the dance. I found these to be very effective in breaking up the scene a little to add contrast and interest. This is a technique that could work quite well in my own film as well, also giving me the ability to hide cuts that don’t work as well without it being too obvious that’s what im doing.
What I found most interesting about this film was the decision to not always follow the structure of the dance chronologically. Instead they would simply choose movements that reflected that point in the music especially towards the end of the piece. This allowed for a much more visually interesting style with the addition of some fantastic close ups. The danger with this technique however is that the scene could potentially become very disorientating which isn’t the feel that I want.
Harry potter Chase scene – Red Riding Hood Chase –
Firstly sorry for the bad quality. This is a fantastic scene that builds suspense and fear really effectively within the film. The combination of mids and close ups as well as the fast cuts between them is what helps to sell this scene to the audience. This will be a similar style to the way that I shoot the Red Riding Hood scene in my film as its the same kind of feel I wish to generate myself.
Part of this scene is comprised of a long wide shot where the camera is mounted on a remotely controlled zip wire that runs along side and in between the actors resulting in a beautiful and effective shot. This would be hard to do on such a small budget but I feel I may be able to do a similar thing with climbing ropes and a simple rig. I will hopefully be able to try some test shots of this to see if I can pull it off and if it would work in my film.
This is a behind the scenes clip of how that shot was filmed.

Notes from Production Meeting – 10/15/17
Set to film next week. Has equipment, crew, locations all locked in for this. Shot list and storyboard are in production for this. Continuity is going to be very important for this so accurate storyboards and shot lists must be in place for the shoot.
Have checked through the brief recently and compiled a task list. Confident about timescales for getting everything completed.
Needs to consider and write about audience and take in to account organisation of the final screenings also.
Main threats:
Forced perspective, need to be practiced thoroughly and go on blog
Any technical issues on the day. Batteries, cards, kit in general.
LikeLike